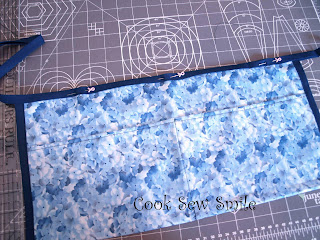
Come and join me on a sew along!
When my sister, Leslie, had her double mastectomy in March she left the hospital with 3 drains which is a normal part of the surgery. Before she had her surgery, Mary, an awesome nurse that works with the mastectomy patients, gave her an apron to wear to help hold her drains from dangling and pulling on her surgical sites. She said that the aprons that she gave her were donated by Komen (I think) and that they normally cost between $65-75 and are not covered by insurance. These were such a life saver for Leslie! The drains fit securely inside the pockets of the apron and therefore did not hang down and she didn't have to try to stuff them in a pocket or pin them to her shirt.
My mom and I being the crafty people that we are, decided to come up with a pattern and start a sewalong for these aprons to be donated to area hospitals and surgical offices that perform mastectomys. These will always be by donation and will never be made for a profit! We have absolutely no interest in making money off of this! That being said, if you are reading this and want to help out but don't sew or have the time and want to donate supplies we would be more than happy to accept them, just message me here!
We want these to stay in your local communities because unfortunately Breast Cancer is everywhere and these can be used everywhere! If you don't know where to take them in your community please message me and I will find a place for you to send them!
All you need is:
a fat quarter or a piece of fabric that is 18" x 22"
a package of Extra Wide Double Fold Bias Tape 1/2" wide or 3 yards if purchasing by the yard
(make sure that it is the double fold so that it is wide enough!) (I may have purchased single fold the first time, ooops!)
and a sewing machine!
First with the fabric laying face down you will fold over one side of the 18" edge 1/4" and iron (if you have a serger you can just serge this edge and go to the next step).
Fold over another 1/4" and iron.
Sew down the edge of the fold that you just made.
It will look like this.
You will then fold down the unsewn edge to make an 8" fold.
Then bring the sewn edge up 5 " and pin in place.
At this point if you have a serger you can just serge the edges if not just sew with a straight seam. You could probably skip this step if you wanted to, but I think that it makes it easier to keep straight when you sew on the bias tape.
Then mark the middle of the pocket and sew a straight stitch down the center to make two pockets.
Now open up the bias tape. You will cut two pieces that are 8 1/2" long. That will leave you with a piece that is 92" long for the tie.
Bias tape has a wide and a short side, I tried to take a picture but it didn't turn out. Put the widest part of the fold on the back side of the apron and the shortest side on the front. This way when you sew down the front you know for sure that you are catching the back side of the bias tape.
Pin the 8 1/2" pieces to each end of the apron leaving the overhang at the bottom of the apron.
You will fold the bottom of the bias tape to the inside and then fold the edge back over, this will make for a cleaner edge. Bias tape will not ravel so you can leave it if you wish to.
But it does look cleaner to me when its folded!
Then just sew down the edge.
Next you will do the same thing with the remaining part of the bias tape along the top edge of the apron. Find the center of the bias tape and match it to the center of the apron and start pinning. Fold over the end of the bias tape like you did for the edges and start sewing at one end and sew all the way to the end of the tie.
That's it! I left the ties really long! The woman that will get the apron can cut to the length that works best for them!
Thank you so much for joining in this sewalong! I just pray that every woman that gets one of these aprons will heal quickly and that she will endure a little less pain when wearing the apron!
Please feel free to share this on your blog, facebook, twitter, etc and please post pictures in the
flickr group if you'd like!
This is where I've shared this post!


